
The band saw ranks among the best workshop tool in this century after table saws. Although professionals and DIYers tend to overlook their usefulness and versatility.
However, their uniqueness lies in their simplicity and structure, making people classify them as a common tool.
Numerous bandsaw accessories have hit the market, contributing to the saw’s efficiency.
Bandsaw accessories include a riser block, tension-release lever, bearing-style guides, and saw table.
Generally, the succeeding paragraphs of this article will examine the upgrades and bandsaw accessories that drive improved performance.
Table of Contents
- Section 1: Band Saw — Choose an Upgrade or Accessorize?
- Section 2: Blade Selection May be the Most Important Section.
- Section 3: Choose the Most Popular Upgrade Plans for your Band Saw to Get Better.
- Section 4: Not all your Improvements to the Band Saw Involves Machine Replacement.
- Section 5: Is Tracking a Necessary Factor Affecting Band Saw Performance?
- Section 6: Maintenance of the Band Saw.
- Summary
Figure 1: A Typical Bandsaw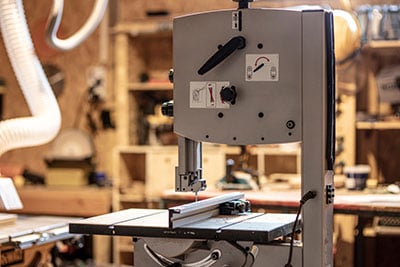
Section 1: Band Saw — Choose an Upgrade or Accessorize?
In this article, the improvement process falls under two broad categories: upgrades and accessories. Specifically, upgrades refer to the complete replacement of machine parts or structures of the bandsaw.
Upgrades will involve the removal of a manufacturer’s original and standard parts. For instance, replacing a chain drive with a belt drive involves substituting sprockets for pulleys and chains for belts.
On the other hand, bandsaw accessories replace worn-out parts with new ones. Additionally, it also includes the swapping of non-wearing parts as well as supplementary parts for optimum performance.
Section 2: Blade Selection May be the Most Important Section.
The blade remains one of the most important bandsaw accessories. It determines how the bandsaw itself will perform and its accuracy of cut.
Besides, if you run a large workshop with a wide range of operations, you would require various styles of blades. The workpiece’s nature will determine the blade-style bandsaw accessories needed for cutting.
Figure 2: Close-up Image of Bandsaw Blades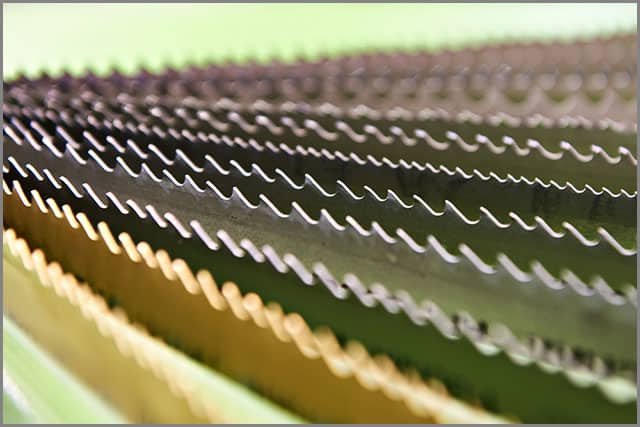
2.1 How to Choose the Right Blade for your Band Saw?
The factors to consider when choosing blades are enumerated below with a detailed explanation:
Blade Width
Here, the focus is on the least radius you intend to cut and your bandsaw’s maximum capacity. Firstly, you must understand that different sawing styles require different blade widths.
Secondly, resawing and cut-off sawing requires the maximum blade width for a clean cut. Lastly, contour sawing requires a narrow blade width to cut any desired radius…
The general chart below shows the relationship between the blade width and the least radius it can cut.

Blade Thickness
Currently, adopting the appropriate thickness of a blade is by far pertinent to longevity and performance. Now, blade thickness varies with the diameter of the bandsaw wheel and the intended work.
Meanwhile, the thicker the blade, the more stress, and strain it can withstand during operation. Just be sure to choose the right thickness that corresponds to your bandsaw as listed below:

Blade Tooth Styles and Sets
Blades come in three tooth styles: regular, skip, and hook. Also, there are three basic tooth sets: rake, alternate, and wavy.
Just like the name implies, a Regular tooth has equally spaced teeth, which are ideal for general cutting. Hence, they give a fine finish when used for cutting thin materials.
Skip tooth blades have their teeth spaced at a zero-degree rake angle. Specifically, this tooth style minimizes clogging when cutting wood, plastics, and non-ferrous metals.
Hook tooth blades have deeper gullets, larger teeth, and a positive ten-degree rake angle. With these teeth configurations, they have a high cutting rate and are more aggressive in advancing into the workpiece.
The raker tooth set is oriented to face the left and right direction and a straight one for the tooth set. Simultaneously, this straight tooth is sometimes called the unset tooth or raker.
The alternate tooth set has two left-right combinations of the tooth without a raker.
The wavy tooth set has teeth to the left and right, separated by a straight tooth in the middle. The wavy tooth set blade is most suited for cutting light metals, pipes, thin sheets, etc.
Figure 3: Skip Tooth Blade.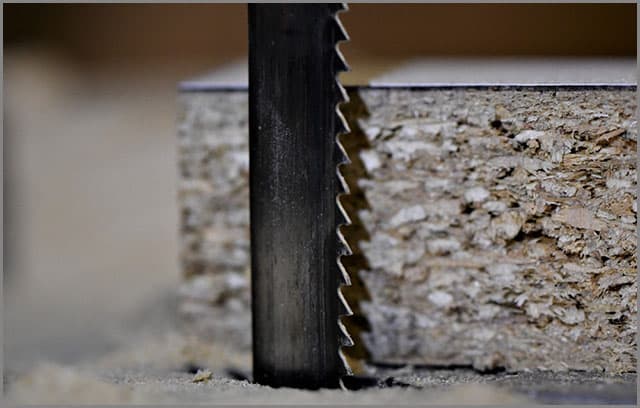
Surface Feet Per Minute (SFM)
Knowing your bandsaw SFM helps you select the best speed for your workpiece. Usually, each manufacturer outlines the SFM rating of their blades in the user manual.
However, if you desire to calculate it yourself, you can use this formula:
SFM = Drive Wheel RPM x Drive Wheel Diameter x 0.262
2.2 What size Blade is the Right One?
The overall performance of your bandsaw also depends on the blade size used. Although the manufacturer’s guide always states the correct size. In the absence of a guide or manual, follow these steps to calculate the size you need:
- Position the pulleys or wheels correctly.
- Measure the distance, C, from the center of one pulley to the other.
- Measure the radius of both wheels or pulleys as (R1 and R2), respectively.
- Apply this formula: Blade length= (R1 X 3.146) + (R2 X 3.146) + (2 X C).
Section 3: Choose the Most Popular Upgrade Plans for your Band Saw to Get Better.
Highlighted below are the four most prominent upgrades you should consider for your bandsaw. Once added to your saw, they help you up your game to derive satisfaction.
3.1 Riser Bloc
Due to the 14″ bandsaws’ limitation to resaw boards up to 6″ wide, a riser block becomes necessary. Subsequently, the riser block is a cast-iron spacer fitted between the bandsaw’s upper and lower casting.
After this, your bandsaw can now resaw boards up to 12″. Nevertheless, it would help if you had a longer blade, a new guard, and a post, which usually comes with the riser block kit.
3.2 Tension -Release Lever
This upgrade makes adjusting the blade’s tension effortless. However you desire. The usual tensioning process can prove tough and arduous, hence the need for this upgrade.
It helps to engage and disengage the blade fast and easily. To install this upgrade, remove the top wheel, the housing, and the tension assembly.
Afterward, drill some part of the upper casting to bolt in place the lever’s gear mechanism. Thus, re-assemble all components so the lever can instantly control the blade’s tensioning.
3.3 Bearing-style Guides
The bearing-style guides help eliminate friction and noise from the blade rubbing against the metal guide block. Even the guides come in an upper and lower set and do not require any disassembly to install.
Finally, they consist of roller bearing that reduces friction and noise and improves blade handling.
3.4 Saw Table
Like a table saw, the saw table will help you create more room for placing lengthy workpiece positioning. Some table comes with added features such as T-tracks, inset miter slots, a rip fence, etc.
A typical saw table measures 24″ x 24″, almost triple the bandsaw’s usual stock table.
Figure 4: Bandsaw Showing its Table.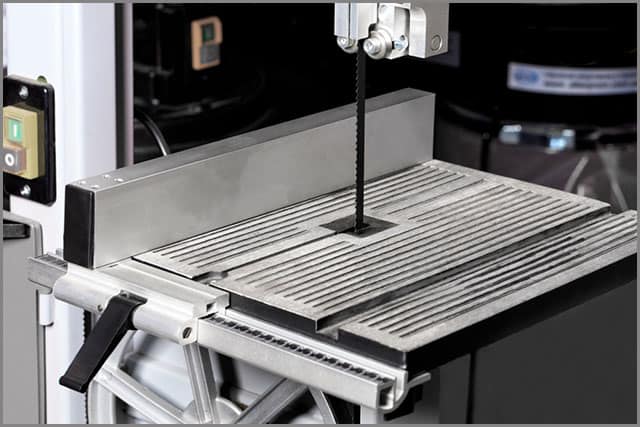
Section 4: Not all your Improvements to the Band Saw Involves Machine Replacement.
If you are not carrying out machine replacement, bandsaw accessories come into play as an alternative for performance enhancement.
Also, accessorizing involves taking out old or worn-out parts for new ones. The importance of all these bandsaw accessories cannot be over-emphasized.
4.1 Urethane Tires
Urethane tires run smoother, quieter, and last longer in service than the typical rubber tire. Unlike rubber tires that get hard over time, urethane tires remain soft and flexible.
Indeed, a soft tire allows the blade to sit well in place. Before installing, soften the urethane tire in hot water, dry it off, and stretch it into the wheels.
4.2 Cool Blocks
It is one of the amazing bandsaw accessories which acts in place of the metal guides. Here, the cool blocks of graphite-impregnated phenolic material allow for easy slippage into place.
Remember that graphite is known for its low friction, which improves blade handling, reduces heat, and guarantees durability.
4.3 Tension Crank
This accessory helps you to turn the adjustment knob properly. Hence, with this crank, you can turn the knob at any position; on the bandsaw.
4.4 Rip Fences
Without bandsaw accessories like a rip fence, getting a straight cut might be difficult on the bandsaw. This fence has features like a knob, set screw, or a wrench for adjustment.
Consequently, whenever drift occurs with ‘s blade your saw’s blade, the ability to adjust the fence compensates for the offset.
Figure 5: Rip Fence Guiding Cutting.
4.5 Resaw Guides
Usually, all resawing tasks require adequate support and guidance for a fine finish. To illustrate, a special feature of the resaw guide over the rip fence is adjusting the feed angle.
However, they can function independently or in conjunction with a rip fence.
4.6 Tension Gauges
With this gauge, you can be sure of not under-tensioning or over-tensioning your blade. Neither tensioning nor under-tensioning is good for your blade or workpiece.
Otherwise, you risk snapping your blade when over-tensioned or having tracking issues when under-tensioned.
4.7 Digital Angle Guide
This guide becomes exceedingly necessary when you desire perfection and precision. Therefore, the bandsaw comes with an angular scale, which often gives inaccurate measurements.
Consequently, the digital angle guide measures accurately and precisely and is easy to install in just two steps.
4.8 Duplicating Pin
This pin helps to attach a template to the workpiece for multiple repetitive cuts. Thus, it ranks as one of the best bandsaw accessories that make your work easier and faster.
4.9 Task Light
For adequate and good visibility when cutting, you need this task light added as part of the bandsaw accessories. Also, the task light comes with a clip or a magnetic base to fit in place.
4.10 Band Saw — Mobile Base
The removable base allows you to move the band saw. Besides, you might need more space away from your workshop, and a mobile base helps you achieve that.
Moreover, a mobile base can save the day if you have a limited workspace and an enormous workpiece.
4.11 Band Saw — Dust Collection Port
As a safety precaution, fine dust given off during cutting should immediately be evacuated and not released into the environment.
Accordingly, a dust collection port helps maintain a clean and safe working environment during and after cutting.
4.12 Band Saw — Saw Welder
If you ever decide not to purchase a blade, you need a saw welder to make yours. Meanwhile, for this purpose, there is no need for filler materials but heat and force.
In summary, these bandsaw accessories help you produce custom-made blades to your preferred length and style.
Section 5: Is Tracking a Necessary Factor Affecting Band Saw Performance?
Truly, when putting band saw accessories in place, the most important factor to look out for is blade tracking. Blade tracking determines if a drift will occur, i.e., if your cut will be straight or not.
Furthermore, the upper and lower wheels must align to ensure proper blade tracking.
Again, the tooth of the blade should always align with the wheel’s centerline.
Section 6: Maintenance of the Band Saw.
- Lubricate all the bearings periodically.
- Keep all adjustment screws clean and lubricated.
- Tighten set screws from time to time.
- Be quick to replace the blade if you suspect poor cutting.
- Inspect tires for deficiencies.
Summary
In conclusion, you should have learned the difference between upgrading bandsaw accessories and various functions. Hence, this knowledge will guide you in efficiently using the bandsaw for all your cutting purpose.
At NCCuttingtools, we provide all saw blades, customized services, and added customer service. Never hesitate to contact us for all your cutting problems and solutions; we will be glad to help.