
Whether for outdoor or indoor purposes, the need to drill through tiles often seems to arise. Usually, this task always requires a high level of technicality to complete and not damage the tiles.
However, with the present state of technological advancement, diamond drill bits have come to the rescue. The diamond drill bits’ special features enable them to perfectly create a hole in tiles.
Its hardness is second to none; as such, it seamlessly drills through any material. This article highlights the specific methods required to become a master user of the diamond drill bit.
Table of Contents
- 1. Diamond Drill Bit– What kind of tiles do you have?
- 2. Diamond Drill Bit– Have the right drill bits for ceramic tiles
- 3. Diamond Drill Bit– How to drill through ceramic tile?
- 3.1 Tools needed for drilling
- 3.2 Diamond Drill Bit– Steps for drilling
- 3.2.1 Fix the tiles and determine the location of the holes.
- 3.2.2 Start drilling.
- 3.2.3 Control the speed of drilling.
- 3.2.4 Speed up at the end.
- 3.3 Diamond Drill Bit- What do we need to pay attention to during the drilling process?
- 3.3.1 Safety measures.
- 3.3.2 Don’t forget to cool the drill bit.
- 3.3.3 Replace the drill bit when hitting the wall.
- 4 Diamond Drill Bit– How to drill a large hole in a tile?
- 5. Diamond Drill Bit– How to prevent scratching tiles?
- 6. Diamond Drill Bit– Frequently asked questions.
- Summary
Figure 1: Ceramic tile drilling.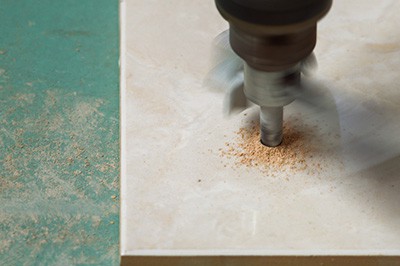
1. Diamond Drill Bit– What kind of tiles do you have?
The types of tiles you intend to work on will determine the appropriate diamond drill bit to use. Tiles vary based on key factors, such as their material, shape, and surface.
The tiles examined here are Glazed ceramic tile, Glass tile, and Porcelain tile. These tiles have unique characteristics, which inform the approach to drilling them.
1.1 Glazed Ceramic Tile
In the tile industry, the word “glazed” does not just mean shiny. Instead, it refers to the enamel coat applied to the surface of a ceramic or porcelain tile.
Enamel is a special glass coating applied to a tile’s surface at a very high temperature in a kiln. It makes glazed tiles non-porous, less dense but thick enough, and very slippery, especially wet.
This coating helps to give the ceramic tile a unique finish and a new set of properties. However, the nature of the finish for the glazed ceramic tile varies; it’s either a matt or glossy finish.
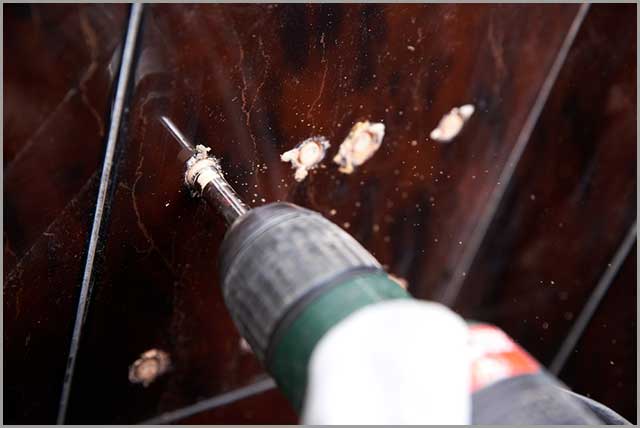
Figure 2: Drilling of glazed ceramic tile.
1.2 Diamond Drill Bit– Glass Tile
For exterior applications where temperatures may rise to 50°C, a glass tile appears the most suitable. Glass tiles hardly lose their color or get attacked by chemicals due to their non-reactive nature.
The production process involves fusing glass and colored glazes at a temperature of up to 900°C.
In indoor areas with low lighting, a glass tile can help reflect light rather than absorb it, which gives better visibility. Their elegant design allows for a solid or multi-colored tile with simple or complex patterns.
You can effectively clean a glass tile with a damp but warm cloth. Lastly, its durability is second to none.
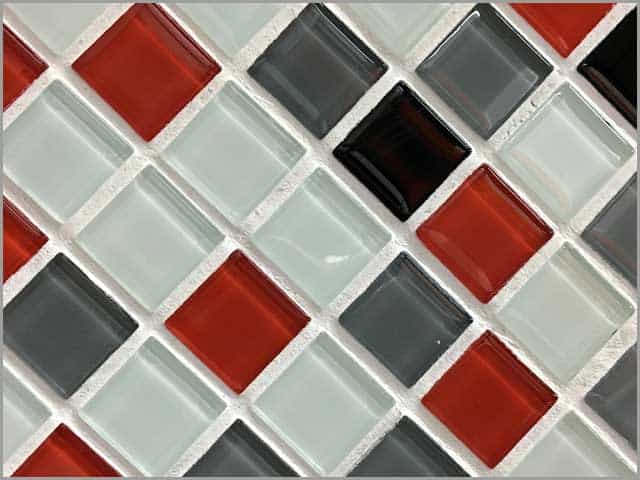
Figure 3: Picture of glass mosaic tile.
1.3 Diamond Drill Bit– Porcelain Tile
A fine mix of clay, sand, and feldspar produces a porcelain tile. After mixing, the firing of the product occurs at a higher temperature than ceramic tile.
Although porcelain and ceramic tile belong to the same tiles category, porcelain tile is technically different. The major difference lies in how much water the porcelain tile absorbs during and after production.
The clay used to produce porcelain tile is less dense and more porous. Professionals consider the porcelain tile as the hardest tile to cut or drill.
Nevertheless, with a diamond drill, a bit-to-drill becomes stress-free. Generally, the finishing of the porcelain tile varies from polished to unpolished or glazed to unglazed.
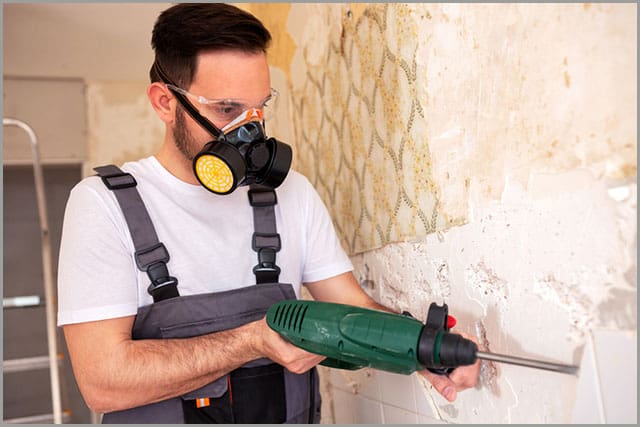
Figure 4: Removal of porcelain tile.
1.4 Diamond Drill Bit– Why are easily broken tiles when cutting or drilling?
The main reason for tiles breaking during cutting or drilling lies in the hardness of the tile. A fact is that hard materials tend to be brittle; they break when impacted by an amount of force.
The first cause of tile breakage is the type of tile because tiles vary in hardness. Porcelain is the hardest, followed by ceramic and then glass tile.
Never use a carbide-tipped drill bit for porcelain tiles; instead, use a diamond drill bit. But a carbide-tipped drill bit does a good job for ceramic tiles. Thirdly, keeping the drilling area wet will also prevent breakage.
2. Diamond Drill Bit– Have the right drill bits for ceramic tiles
Out of the problems that may occur when drilling, the solution often lies in your drill bit’s choice. Whether the hole is small or large, the principle remains the same.
For any tile, the diamond drill bit remains superior to the carbide-tipped drill bit. But they require coolants to reduce heat when cutting, while others can run dry and still do a perfect job.
3. Diamond Drill Bit– How to drill through ceramic tile?
At some point, the need to drill your tile may arise. Several steps culminate in drilling a hole through a ceramic tile successfully. You need to abide by these steps sequentially to avoid problems.
Also, they involve using various tools to carry them out, asides from the diamond drill bit and drill. Again, adherence to necessary safety measures and rules remains key to completing this task.
3.1 Tools needed for drilling
· Masking tape: The masking tape prevents scratching of the tile’s surface. Once the tape is in place, use a pencil to mark the center of your hole.
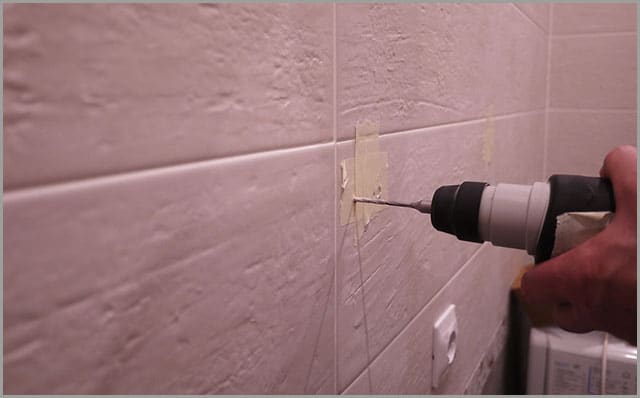
Figure 5: Masking tape on the tile in preparation for drilling.
· A wooden template: This will guide the diamond drill bit as it proceeds into the tile through the marked center. This template should be slightly wider than the intended hole.
· Diamond drill bit: Get the bit’s required size, which is extremely hard.
· Variable-speed drill: You can select from a range of speeds with this drill.
· Coolant: Water or cutting oil would suffice as a coolant to prevent overheating of the bit.
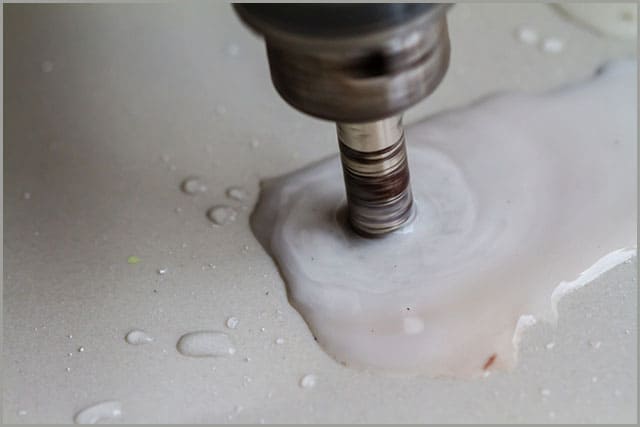
Figure 6: Water used as a coolant during drilling.
3.2 Diamond Drill Bit– Steps for drilling
Take the next steps to determine drilling results. If carried out properly, you have a clean and finely cut hole. Otherwise, cracks, scratches, and shattering could occur, which give you a bad cut.
All the tools mentioned above comes into play for perfect drilling. Generally, the steps include; mask taping, measuring, marking out, and running the drill at an average speed.
An extra tip is to make a wooden template if your cut is repetitive. These tips below will minimize the possibility of any crack, shatter, or scratch on your tile. Above all, get the best drill bit for the job.
3.2.1 Fix the tiles and determine the location of the holes.
It is the first step in drilling a tile. You start by putting the masking tape around the location of the intended hole. You follow by using a measuring tape to determine and mark out the precise location of the hole.
Then, mark an X-sign at the approximate center of the hole with a pen or pencil. Whenever you have multiple holes to drill, you need a wooden template for easy cutting.
This wooden template will save you the stress of measuring and marking out repeatedly. Subsequently, place the wooden template on the different locations of the hole on the various tiles.
3.2.2 Start drilling.
First, put off any extra function like the hammer or impact mode, and set the speed to low or average. Keep a bowl of coolant (water of cutting fluid) close by, so periodically cool off the diamond drill bit when cutting starts.
Use a wooden template to guide the drill bit into the hole as the initial cone forms.
Ensure you firmly hold the wooden template on the tile. But also make sure its center coincides with that of the hole. Keep in mind that slow and steady wins the race; drilling tile often requires a lot of patience.
Don’t forget that the time required to drill the hole will vary depending on the tile type.
Figure 7: Drilling in progress showing dust given off.
3.2.3 Control the speed of drilling.
Put on the drill and run at low to average speed. Practically, the ideal speed to run the drill ranges from 100 to 200 revolutions per minute. Running the drill at low speed prevents overheating and burning of the bit.
While running at this speed, avoid applying too much pressure. It would be best to allow the drill bit to cut at a low speed while you guide its direction.
Applying too much pressure would lead to cracks and eventual damage, which leads to wastage. Finally, do not forget that drill bits have their limit concerning the allowable rotary speed.
3.2.4 Speed up at the end.
Typically, the smaller the diameter of the drill, the drilling faster. As you approach the end of your drilling, a change of resistance occurs.
At this point, you can speed up the drill as you back off the pressure. This practice helps the extension of the hole into the back wall or board.
Speeding the drill towards the end helps you finish up all at once. Nonetheless, pay careful attention to when the hole breaks through, especially if it’s an already installed wall tile.
Behind most installed wall tile wires, pipes, etc., run beneath the walls.
3.3 Diamond Drill Bit- What do we need to pay attention to during the drilling process?
As the drilling process commences, you must consider some established rules of thumb. It depends on the type of drill used for drilling. If your drill has an impact mode, you must put it off during drilling.
Also, use the lowest possible speed to avoid burnout and smoke around the hole. Aside from these tips, ensure you adorn the proper safety gear and obey safety measures as prescribed by the manufacturer.
Lastly, cooling the drill bit during the drilling process is essential. This act reduces friction and increases the durability of your diamond drill bit.
3.3.1 Safety measures.
The following are preventive measures to avoid accidents or mistakes during drilling:
a. Never attempt to adjust the drill when operating.
b. Keep the built-off chips off the tile’s surface as the drill proceeds.
c. Do not make any adjustments while the machine is operating.
d. Pre-test the drill before the main job commences.
e. Keep all necessary guards and extra components in place to make drilling easy.
f. Wear eye protection, gloves, and, if possible, an earmuff.
g. For large holes of up to 2 or 3 inches in diameter, cut in sequence and not just at once.
3.3.2 Don’t forget to cool the drill bit.
Cooling the diamond drill bit is an unavoidable process during tile drilling. The process is repetitive and must continue from start to finish of the drilling process.
Failure to cool the diamond drill bit would wreak havoc on your job and delay your project. Firstly, if you do not cool the bit, overheating will occur. When overheating occurs, the tile will begin to burn at the edges of the hole.
Secondly, not cooling the bit will cause quick wear of the bit’s tip. Lastly, the diamond drill bit loses its expected properties and efficiency when wear and tear occur.
3.3.3 Replace the drill bit when hitting the wall.
If the drilling job is for an already installed wall tile, you would have to pay extra care when drilling. Walls might contain pipes, wires, cables, and so many more beneath them.
Failure to stop may cause damage and accidents that will make you incur more costs on the project.
Since the goal is to drill through the tile and wall, a drill bit change may be necessary. Know fully that you need the appropriate drill bit fit for concrete or wood to continue drilling.
The best practice is never to lose focus and to understand the terrain where you are drilling.
4 Diamond Drill Bit– How to drill a large hole in a tile?
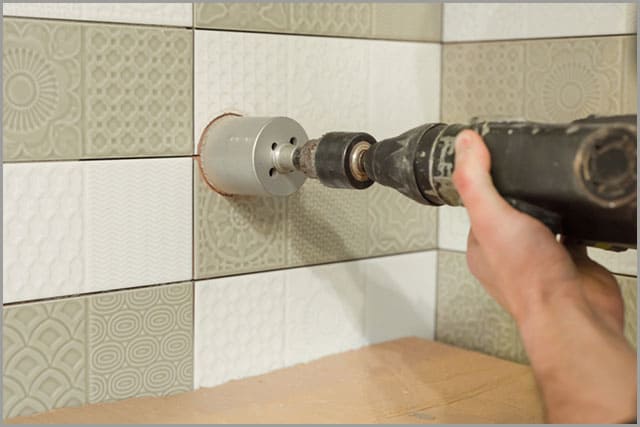
Drilling a large hole is slightly different from drilling a small hole; large holes require better accuracy and stability. Although a diamond drill bit can drill large holes, experts recommend a diamond core bit.
A diamond core bit contains a pilot bit, which helps to guide it through when drilling. The diamond core bit gives off a fine chunk of the tile known as the core.
In practice, holes for domestic purpose ranges from 3-6 inches in diameter; this makes the core bit a good match.
Figure 8: Diamond core bit used to drill tiles.
4.1 Diamond Drill Bit– How to drill in a tile without a hole saw?
Sometimes you find yourself in a situation without access to a hole saw or core bit. When this happens, you have to stick to the diamond drill bit. However, using the diamond drill bit for large holes requires a special as listed below:
a. Place masking tape over the intended drill area.
b. Measure and mark out the exact outline of the hole on the tape.
c. With the smaller drill bits, drill small holes around the outline at about ½ inches intervals.
d. Use a hammer to tap out the center of the hole.
5. Diamond Drill Bit– How to prevent scratching tiles?
When using the diamond drill bit, the likelihood of a scratch is somewhat inevitable. Slippage occurs when drilling highly-glazed tile, which could cause an accidental scratch on the tile’s surface.
Firstly, put masking tape around the intended drill region to avert scratches. The tape also protects the tile’s surface should the diamond drill bit drift off the targeted point.
Besides, it would be best if you learned to allow the drill to do the job and apply moderate pressure when drilling.
6. Diamond Drill Bit– Frequently asked questions.
We know you have some other questions you seek answers to; hence this section presents some solutions.
6.1 Diamond Drill Bit– Why is the tile hard to fasten?
No doubt, the term “fastening” differs in contextual meaning. But in this context, it refers to how to keep an uninstalled tile firmly held when drilling.
The main issue here lies in the brittleness of tiles because, from history, hardness equals brittleness. Owing to its brittleness, you cannot place too much pressure on it when holding to drill.
The usual bench vice will not work; instead, you must use your hands. You can exert mild pressure to hold down on your workbench for drilling with your hand.
Never attempt to fasten a tile with any holding device, or you risk a break.
6.2 Diamond Drill Bit– Can I use a Hammer Drill to drill the tile?
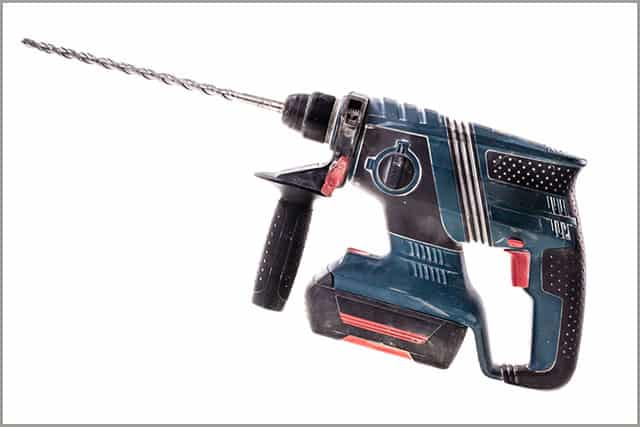
Many people do not know the difference between a regular drill and a hammer drill. Although these two drills look physically alike, the difference lies in the amount of force delivered.
Hammer drills have an impact mechanism that generates a hammer-like motion. On the other hand, the regular drill does not produce any hammering action when drilling.
But all hammer drills have a feature/button to put on/off the hammering mode. It implies that a hammer drill also has the inherent features of a regular drill.
In essence, you should only use the hammer drill for brick and concrete, not tile.
Figure 9: A typical hammer drill.
6.3 Diamond Drill Bit– What makes porcelain tile so hard to drill?
Porcelain tile contains clay, sand, and silica gel, followed by heating at very high temperatures in a kiln. This high temperature alters the chemical structure of the porcelain tile and makes it dense.
The crystallography and overall chemistry of the tile change as heating continues and is responsible for its unique strength. The rich silica content makes it arduous to drill with a carbide-tipped drill bit.
Even the generic tile cutter cannot do the cutting. Glazing a porcelain tile now adds extra hardness, which translates into more strength and durability.
Ultimately, you can drill the porcelain tile with a diamond drill bit but with a coolant application.
Summary
Whether as a small supplier, distributor, or DIY enthusiast, we know you will find the knowledge shared here important.
At NCCuttingtools, we have developed advanced technology to help us produce quality diamond-cutting tool solutions. Contact us today for a quote as you plan to start your tile drilling adventure.